In-App SDK Integration
Version History
| Date | Version | Details |
|---|---|---|
| 21/01/23 | 1.7.0 | Initial version |
| 16/06/23 | 1.7.4.1 | Fixes |
| 22/12/23 | 1.7.4.7 | Fixes |
| 04/12/25 | 1.7.5.5 | Updated version |
High-level Integration flow
The following is a high-level overview to enable Tap on Phone on a merchant device, the App uses the iPOSgo SDK to initialize a ToPService and access its features.
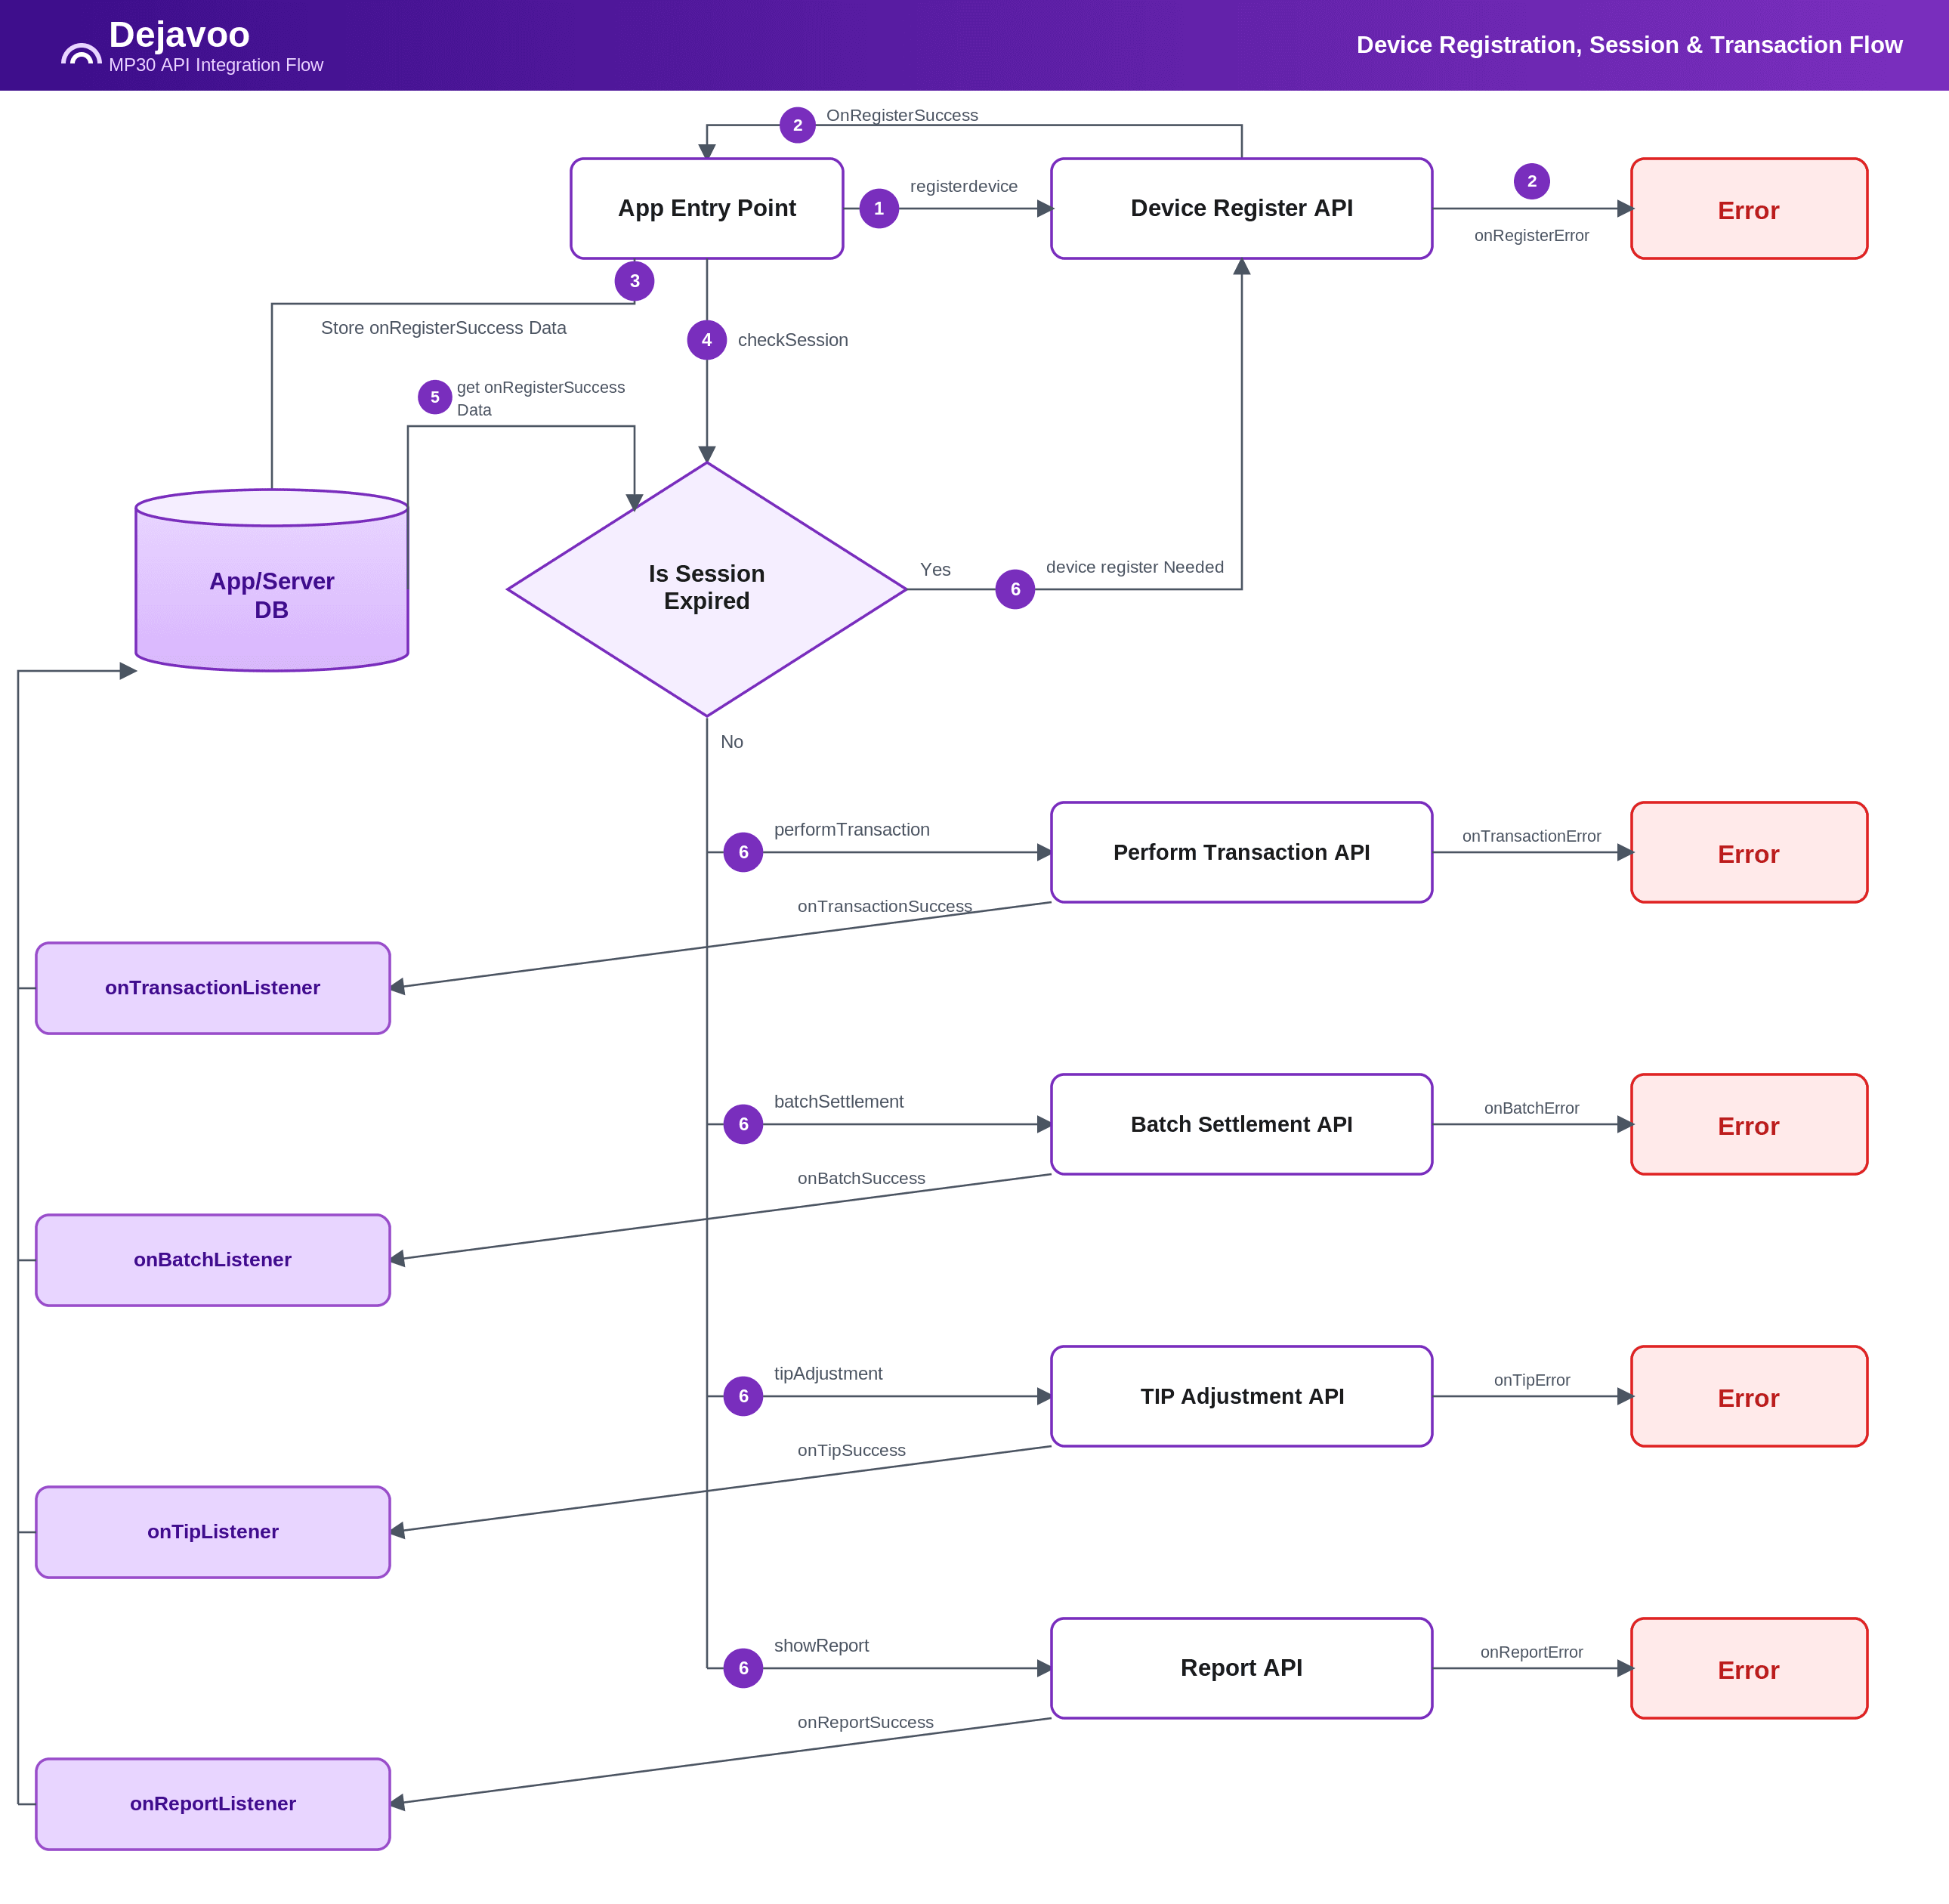
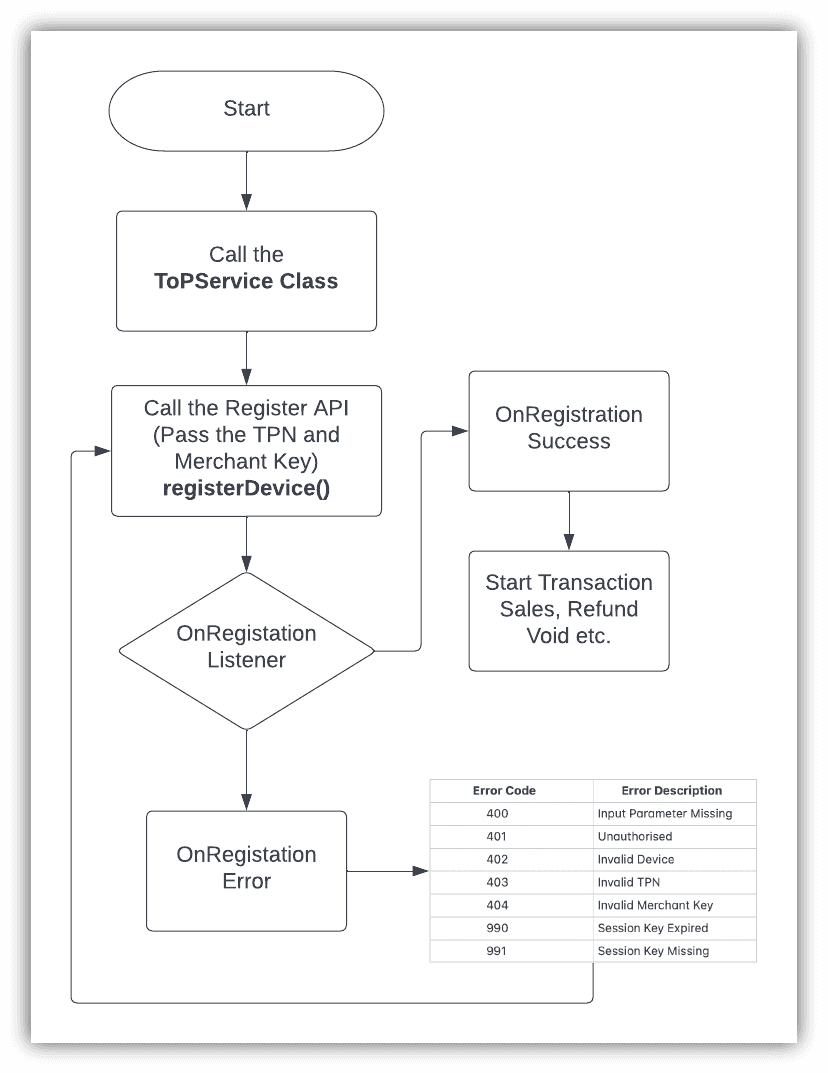
- The App creates an instance of the ToPService class and calls the topService.registerDevice() method of the iPOSgo SDK. The request includes registration details such as the TPN, merchant code, and a registration listener. The registerDevice() method sends the registration payload to the iPOSgo backend system to authenticate the device.
- Upon successful registration, the SDK invokes onRegisterListener.onRegisterSuccess() with a JSON object containing the message, session key, server key, session creation timestamp, and session expiry (in seconds). If registration fails, the SDK invokes onRegisterListener.onRegisterError() with an error code and message (e.g., invalid TPN, invalid access code, invalid device).
- The App stores the successful registration response in its SharedPreferences or local database so it can be validated later, at transaction time.
- Before every new transaction, the App must check the session data.
- The App retrieves the session key and expiry timestamp from its database and validates them.
- If the session has expired, the App must call registerDevice() again to obtain a new session before proceeding.
- If the session is still valid, the App calls the relevant iPOSgo SDK method for the action being performed: performTransaction(), batchSettlement(), tipAdjustment(), or showReport().
- Each call returns its corresponding listener: the success listener (onTransactionSuccess(), onBatchSuccess(), onTipSuccess(), or onReportSuccess()) with the response data, or the error listener (onTransactionError(), onBatchError(), onTipError(), or onReportError()) with an error code and message.
- The App stores the success or error response in its local database or sends it to the backend system.
Prerequisites
For Sandbox (UAT) Users should be onboarded on iPOSpays sandbox(UAT) environment as a merchant and have a valid TPN.
For Production (Live) Users should be onboarded on iPOSpays production environment as a merchant and have a valid TPN.
If you do not have a TPN, contact your ISO or devsupport@dejavoo.io.
Supported Payment Processors
- TSYS
Steps to Access the TOP SDK or API Keys
Step 1: Log in to the iPOSpays portal.
Step 2: Mechant Keys/Ecom Token
- Navigate to Menu → Settings → Mechant Keys/Ecom Token.
- Select the TPN.
- Click Generate.
Step 3: Access TOP SDK APIs
Use the TPN and Merchant Code to access the following APIs:
- Device Register
- Perform Transaction
- Tip Adjustment
- Batch Settlement
- Reports
Step 4: Access Void, Refund, and Batch Settlement APIs
- Use the TPN and Auth Token for these APIs.
Step 5: Implement Direct Void, Refund, and Batch Settlement APIs
- Navigate to Menu → Developer Central → iPOS Transact → API Document for detailed instructions.
Installation Setup
Download Android Studio from https://developer.android.com/studio
Supported Devices & Versions:
- Devices running Android OS 8.1 or later.
- Devices with NFC compatibility.
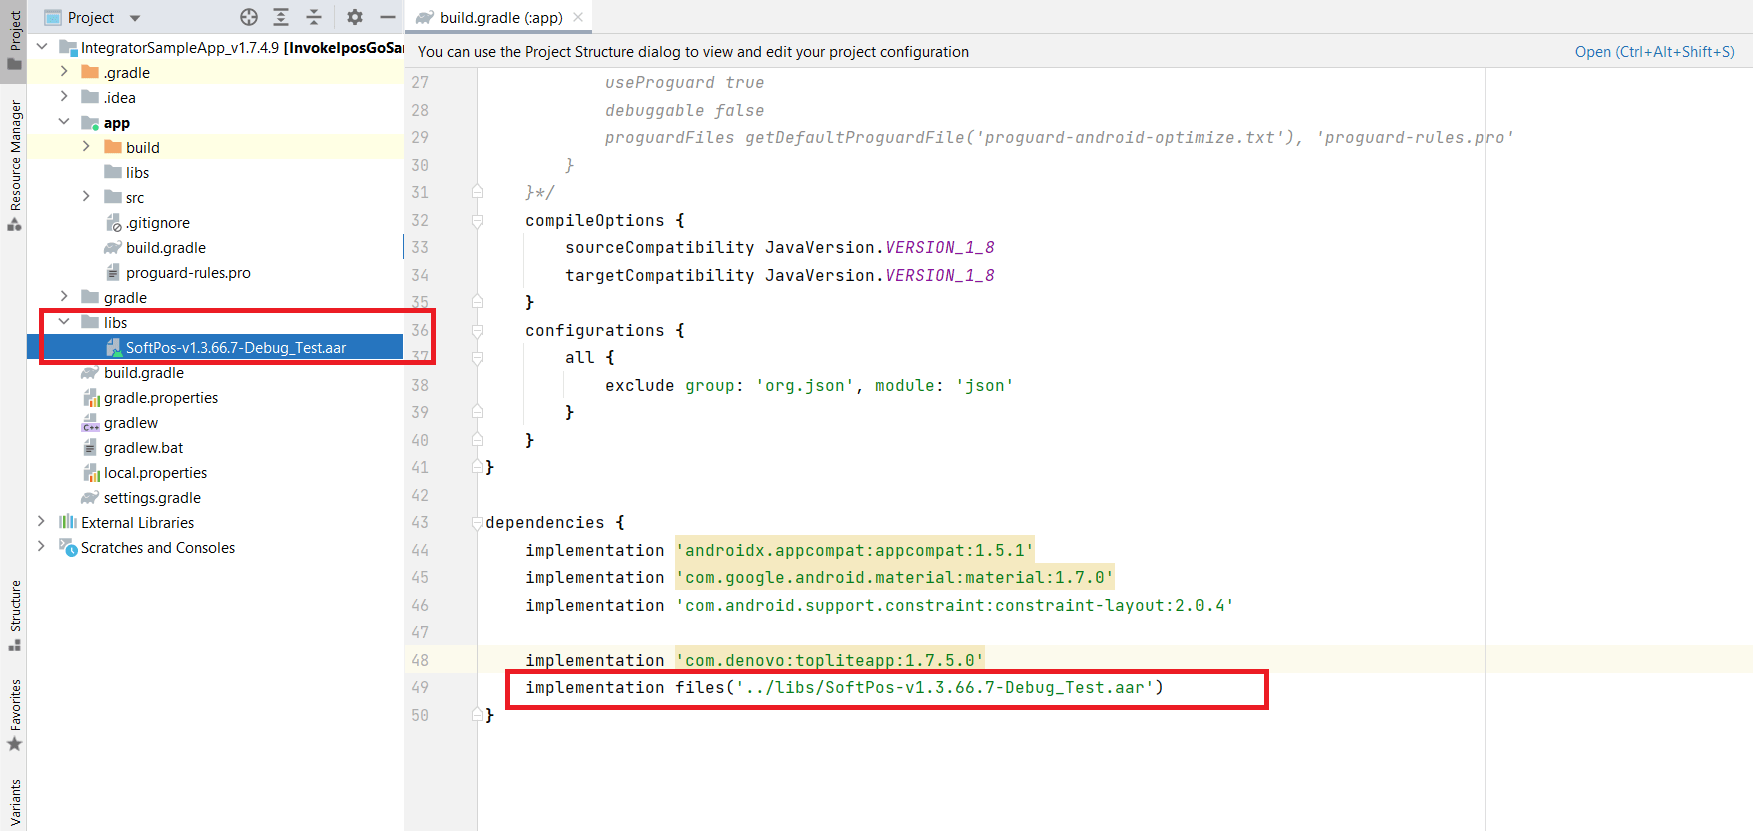
- Add the SDK libraries (*.aar) to the "libs" folder of your existing Android project.
Example: SoftPos-v1.3.66.7-Debug_Test.aar
If your project does not already have a "libs" folder, create one in the root of the project by right clicking the project and choosing "New" and then "Folder.
- Add the line in gradle.properites in the root folder of your project, to support the legacy in the SDK.
android.enableJetifier = true- Add the lines in build.gradle or setting.gradle of your project
allprojects {
    repositories {
        jcenter()
        flatDir {
            dirs 'libs'
        }
            maven {
    url "<DEJAVOO_MAVEN_REPOSITORY_URL>"
    credentials(AwsCredentials) {
        accessKey "<DEJAVOO_ACCESS_KEY>"
        secretKey "<DEJAVOO_SECRET_KEY>"
    }
}

    }
}
Note: Contact devsupport@dejavoo.io to obtain the Maven repository URL and credentials required to access the library.
- Add the lines in build.gradle(app) of your project
dependencies {
    ...
    implementation 'com.denovo:topliteapp:1.7.6.0'
    implementation files('libs/SoftPos-v1.3.66.7-Debug_Test.aar')
}
Permissions
The Prerequisite permissions which need to be used in manifest file
Add the following line tool:replace inside the application tag, which will avoid the manifest merge errors
<application>
 android:name="YOUR_APPLICATION_CLASS"
 android:allowBackup="true"
 android:icon="@mipmap/ic_launcher"
 ...
 tool:replace="android:allowBackup,android:roundIcon,android:theme">
activity
</application>
Application Class Integration
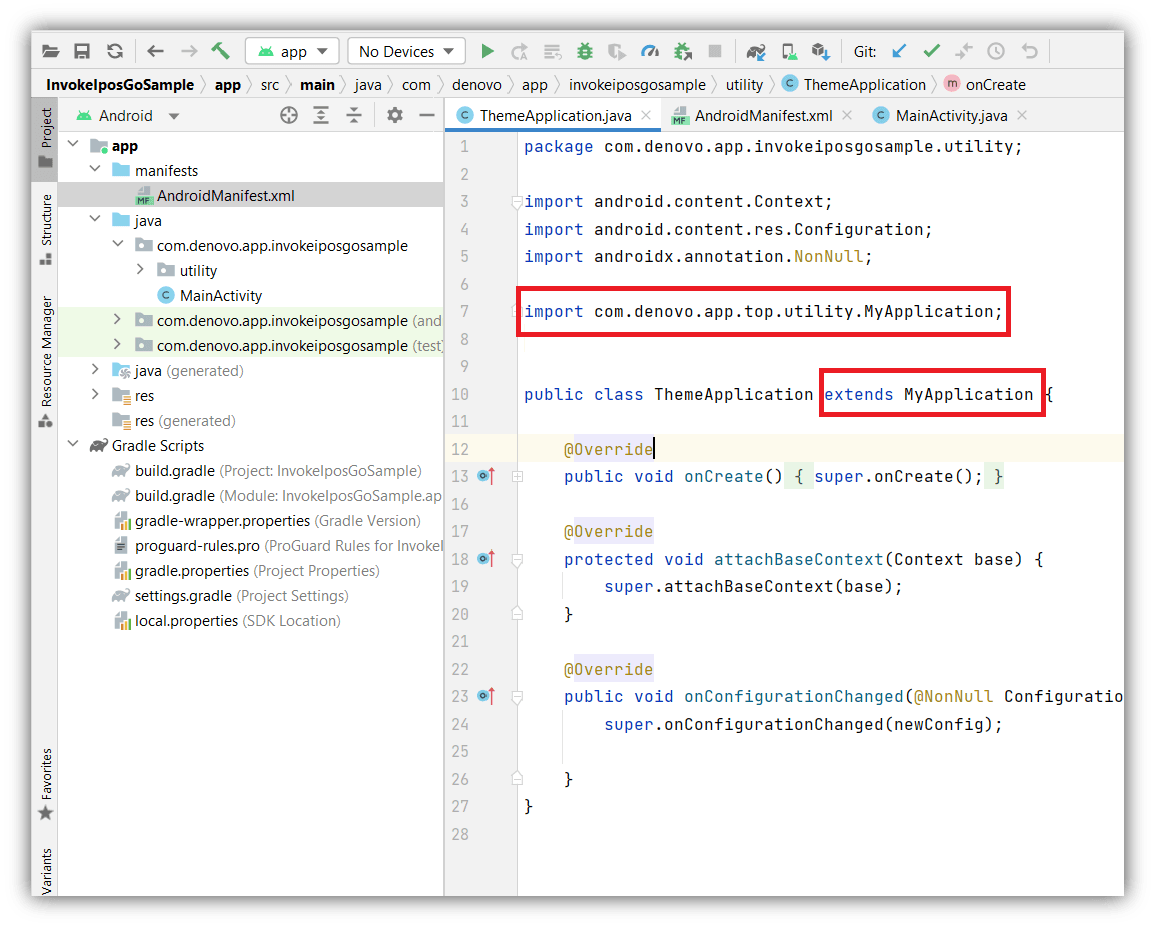
To integrate the SDK, your application must extend the MyApplication class provided by the Theme Application.
If your project already has a custom Application class, update it to extend MyApplication instead of android.app.Application.
Ensure that this Application class is registered in your AndroidManifest.xml.
ThemeApplication refers to your application class.
Proguard-rules.pro
Add below lines in proguard-rules.pro of your project
-keep class * implements java.io.Serializable
-dontshrink

-keep class vhbgotabuuowoix.** { *; }
-keep class com.denovo.app.top.** { *; }
-keep class com.denovo.app.top.business.models.** { *; }
-keep class com.denovo.app.top.device.emv.** { *; }
-keep class com.denovo.app.invokeiposgo.* { *; }
-keep class com.denovo.app.invokeiposgo.models.** { *; }
-keep class com.denovo.top.epay.hppDataResult.models.** { *; }
-keep class com.cardtek.softpos.** { *; }
-keep class orion.acquila.libra.** { *; }
-keep class com.cloudpos.** { *; }

-dontwarn com.cloudpos.**

-keep public class com.wizarpos.jni.* { public *; }
-keep class com.wizarpos.security.injectkey.* { *; }
-keep class com.wizarpos.security.injectkey.aidl.* { *; }

-keepattributes Signature

-keep class com.google.gson.** { *; }
-keep class com.google.gson.stream.** { *; }

-keep class sun.misc.** { *; }
-keep class sun.misc.Unsafe { *; }

-dontwarn sun.misc.Unsafe
-dontwarn javax.annotation.**
-dontwarn org.codehaus.mojo.animal_sniffer.IgnoreJRERequirement

-dontwarn retrofit2.**
-keep class retrofit2.** { *; }

-keepattributes *Annotation*, Signature, Exceptions

-keepclasseswithmembers class * {
    @retrofit2.http.* <methods>;
}

-keepclassmembernames interface * {
    @retrofit.http.* <methods>;
}

-keep class okhttp3.** { *; }
-keep interface okhttp3.** { *; }
-keep class okio.** { *; }

-dontwarn okhttp3.**
-dontwarn okio.**

-keepnames class okhttp3.internal.publicsuffix.PublicSuffixDatabase

-optimizations !method/removal/parameter

-dontwarn com.squareup.moshi.**
-keep class com.squareup.moshi.** { *; }
-keep interface com.squareup.moshi.** { *; }

-keep @com.squareup.moshi.JsonQualifier interface *

-keepclasseswithmembers class * {
    @com.squareup.moshi.* <methods>;
}

-keepclassmembers class * {
    @com.squareup.moshi.FromJson <methods>;
    @com.squareup.moshi.ToJson <methods>;
}
Add Paycore library into the project
Add the paycore library in the integrator app as shown in the image.
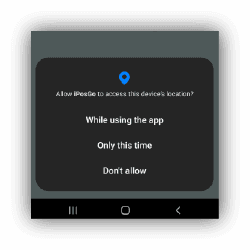
Ask Location Run-Time Permission Dialog
Add the Location run-time permission on your application level, like shown in the image.
Device Register API
This API is used on every new install of App, cache clear, data clear of your application, check whether session data are available or not. If not, then call the register device API. To do create an instance of Top Service class and call the register device() method to invoke device registration process. Please do flow the below flowchart diagram.
Request Parameters
| Field | Type | Description | Example |
|---|---|---|---|
| TPN * | string | It’s a Unique 12digit code. This value is unique for each merchant. | 123456789012 |
| Merchant Code * | string | A unique code is generated and assigned to each merchant | 210987654321 |
| registrationListener * | string | Create an instance object & pass the object or create Anonymous callback to receive response. | OnRegistrationListener registrationListener = new OnRegistrationListener (); or new OnRegistrationListener ({//@override methods}); |
Snippet Code
ToPServicetopService=newToPService(Activityactivity);//showprogressdialogheretopService.registerDevice(tpn,
merchantCode,
newToPService.onRegistrationListener(overridepublicvoidonRegisterSuccess(JSONObjectsuccessObject){
  //dismissprogressdialoghere//samplesuccessresponse{
    “message”: “Registrationdonesuccessfully”,
    “session_key”: “xxxxxxxxxxxxxxxxxxxxxx”,
    “auth_token”: “xxxxxxxxxxxxxxxxxxxxxx”,
    “session_created_timestamp”: ”1672038767”“session_expire_time”: “86400”
  }
}publicvoidonRegisterError(JSONObjecterrorObject){
  //dismissprogressdialoghere//sampleerrorresponse{
    “error_code”: “403”,
    “error_message”: “InvalidTPN”
  }
}@overridePublicvoidonProcess(Stringmessage){
  //updateprogressdialogmessagehere
}
});
To Obtain Merchant Code:
-
Login to the iPOSpays portal using a merchant account.
-
Go to Settings → Mechant Keys/Ecom Token.Choose a Tap on Phone (TOP) TPN from the drop-down menu → copy the merchant code and save it.
Response Parameters
| Field | Type | Description | Example |
|---|---|---|---|
| message * | string | Status message is shown when session key generated successfully. | Registration done successfully |
| session_key * | string | Session Key is used to access the sub sequent of iPOSgo sdk API’s. So, this key must be maintained across the application. | ff8c2759-ba8e-4abe-a4a7-9f6d116194e9 |
| auth_token * | string | Auth Token is used to interact with iPOSgo backend system to do the void, batch settlement, etc., | API access Token |
| session_created_timestamp * | string | Session Key created timestamp in milliseconds is used to validate the session key expiry | 1672038767 |
| session_expiry_in_ millseconds * | string | This will indicate that the session key expiry time in milliseconds. Default expiry is 24hrs. | 86400000 |
Perform Transaction API
This api is used to accept a contactless EMV transactions. Calling this API will trigger the SDK to enable NFC for a contactless communication between the payment card and device. On successful card read, SDK will send and process transaction.
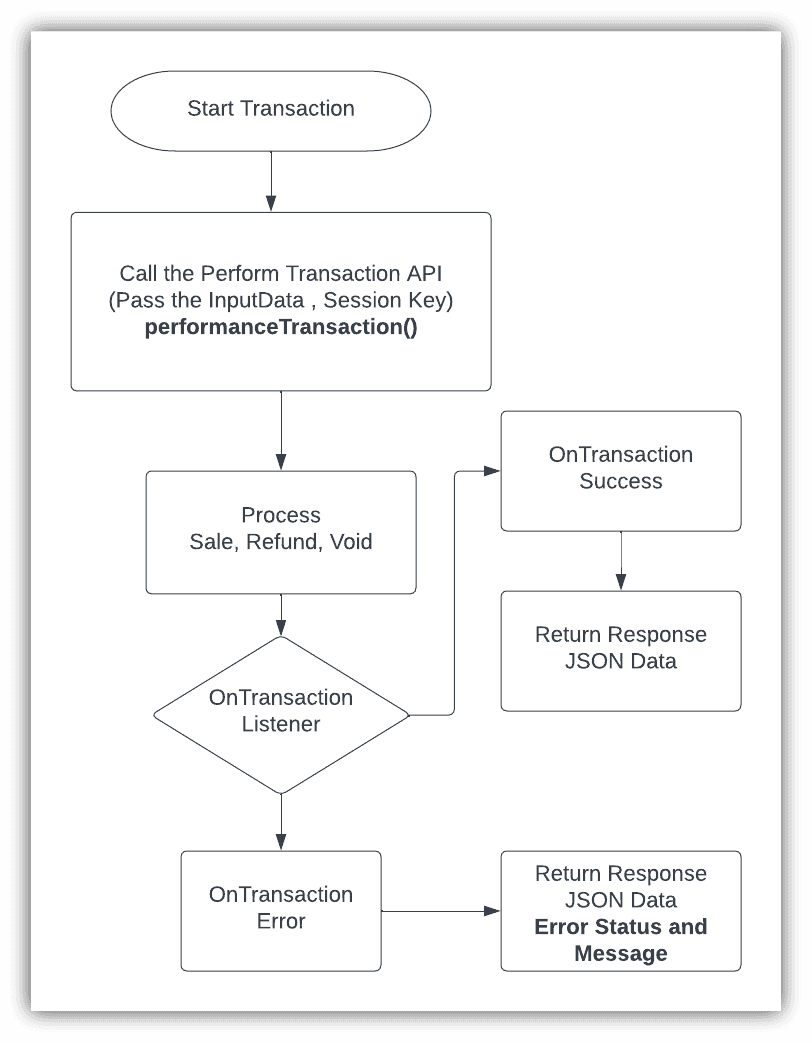
To perform the transaction API app needs to pass a JSON object(contains amount, type), Session key, custom object(HashMap), transaction listener as input parameters. we will get the response on asynchronous transaction listener methods.
Request Parameters
| Field | Type | Description | Example |
|---|---|---|---|
| inputObject * | string | Pass the raw JSON data | { “type”: “SALE”,“amount”: “20.00” } Or { “type”: “REFUND”,“amount”: “20.00” }Or{ “type”: “VOID” } |
| sessionKey * | string | Pass the Session key which received on successful registration. | ff8c2759-ba8e-4abe-a4a7-9f6d116194e9 |
| onTransactionListener * | string | Create an instance object & pass the object or create Anonymous callback to receive response. | new onTransactionListener();or new onTransactionListener({}); |
Snippet Code
ToPService topService = new ToPService(Activity activity);
topService.performTransaction(inputObject, sessionKey, new ToPService.OnTransactionListener {

    @ Override
    public void onTransactionSuccess(JSONObject successObject) {
        // sample success response
        {
            “status”: “Approved”,
            “last_4_digits”: “1234”,
        }
    }

    @ override
    public void onTransactionError(JSONObject errorObject) {
        // sample error response
        {
            “status”: “declined”,
            “message”: “Card limit exceeds”
        }
    }

    @ override
    Public void onRegisterNeeded(JSONObject errorObject) {
        //sample error response
        {
            “error_code”: ”960”,
            “message”: ”Session key is expired,
            To authenticate,
            please re - intiate device registration api”
        }

        //ssl exceptio handling
        try {
            if (jsonObject.getString(TOPParams.ERROR_CODE)
                    .equals(TOPParams.SSL_SECURE_CONNECTION_ISSUE_CODE)) {
                restartApp(getApplicationContext());
            }
        } catch (JSONException e) {
            throw new RuntimeException(e);
        }
    }
});

public static void restartApp(Context context) {
    Intent intent = context.getPackageManager()
            .getLaunchIntentForPackage(context.getPackageName());

    if (intent != null) {
        intent.addFlags(Intent.FLAG_ACTIVITY_CLEAR_TOP | Intent.FLAG_ACTIVITY_NEW_TASK);
        context.startActivity(intent);

        if (context instanceof Activity) {
            ((Activity) context).finish();
        }

        // Kill the current process to ensure full restart
        android.os.Process.killProcess(android.os.Process.myPid());
        System.exit(0);
    }
}
Response Parameters
| Field | Type | Description | Example |
|---|---|---|---|
| onTransactionSuccess * | string | On successful transaction, it returns response as JSON data which have all the transaction details. | { “status”: “Approved” “last_4_digits”: “1234”, “transaction_title”: “SALE”, “transaction_type”: “1”, “transaction_mode”: “1”, “transaction_id”: “000001”, “invoice_no”: “000002”, “amount_paid”: “20.00”, “card_type”: “MASTERCARD”, “mask_pan”: “**************5678”, “date”: “2022-07-06”, “time”: “13:05:22”,} |
| onTransactionError * | string | If transaction get any error, it returns the response as JSON data which have the appropriate error message. | { “status”: “declined”, “message”: “Card limit exceeds”} |
Batch Settlement API
A batch is a group of transactions that have been processed but have yet to be settled. When a transaction is approved, it is added to the batch. When a batch hasn’t been settled yet, it is called an open batch, and transactions in the batch can still be voided and reversed if needed.
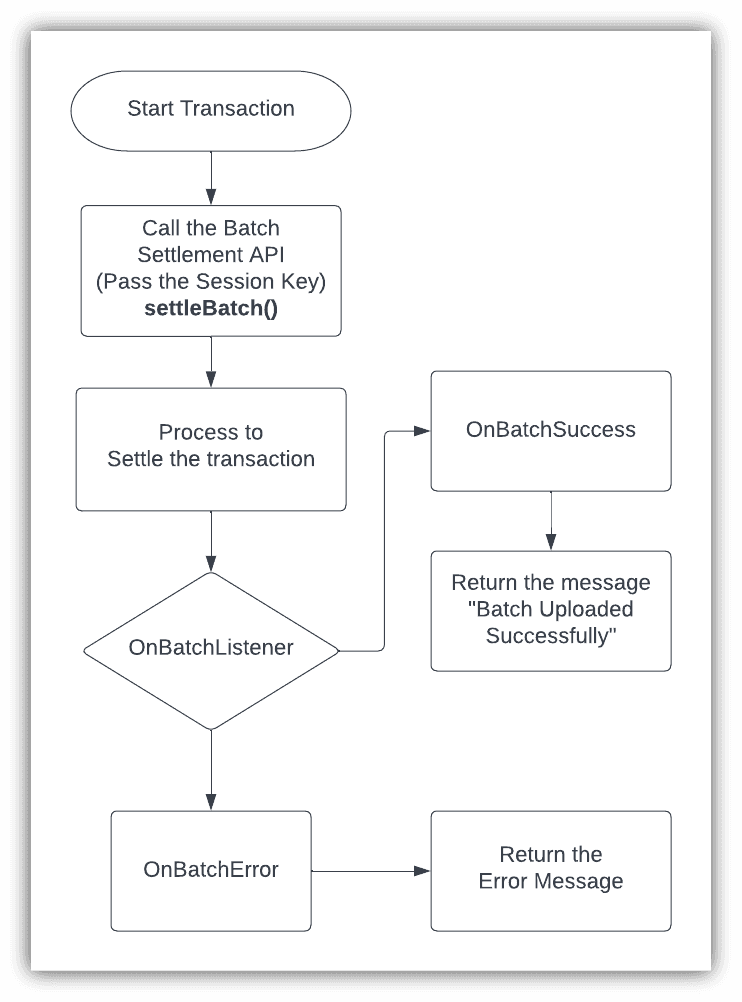
Request Parameters
| Field | Type | Description | Example |
|---|---|---|---|
| sessionKey * | string | Pass the Session key which received on successful registration. | ff8c2759-ba8e-4abe-a4a7-9f6d116194e9 |
| onBatchListener * | string | Create an instance object & pass the object or create Anonymous callback to receive response. | new onBatchListener ();or new onBatchListener ({}); |
Response Parameters
| Field | Type | Description | Example |
|---|---|---|---|
| onBatchSuccess * | string | Status message is shown when batch settlement done successfully. | |
| onBatchError * | string | Status message is shown when batch settlement getting error. |
Snippet Code
ToPService topService = new ToPService(Activity activity);
topService.batchSettlement (sessionKey, new ToPService. onBatchListener {
@Override
 public void  onBatchSuccess(String success){
       // sample success response
  }
@override
public void  onBatchError(String errorObject) {
        // sample error response
 }
@override
Public void onRegisterNeeded(JSONObject errorObject){
//sample error response
       {
          “error_code”:”960”,
          “message”:”Session key is expired,To authenticate,please re-intiate device registration api”
         }
}
});
Tip Adjustment API
This method is used to add tip amount for the existing transactions and, we can get the summary of adjust tipped transactions.
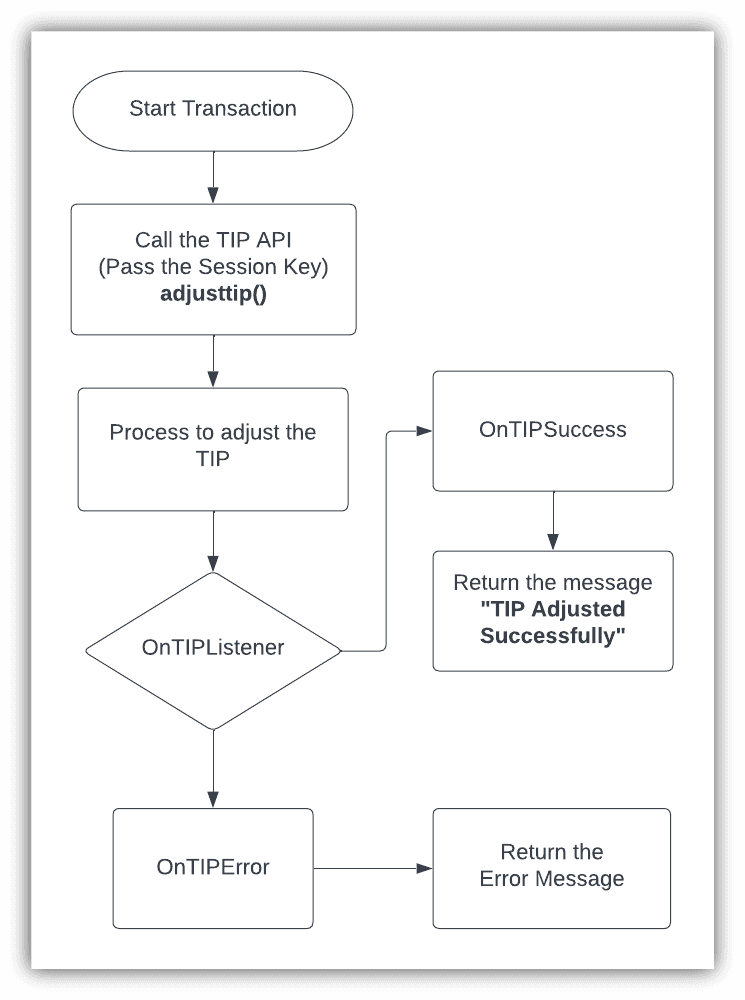
Request Parameters
| Field | Type | Description | Example |
|---|---|---|---|
| sessionKey * | string | Pass the Session key which received on successful registration. | ff8c2759-ba8e-4abe-a4a7-9f6d116194e9 |
| onTipListener * | string | Create an instance object & pass the object or create Anonymous callback to receive response. | new onTipListener (); or new onTipListener ({ }); |
Response Parameters
| Field | Type | Description | Example |
|---|---|---|---|
| onTipSuccess * | string | Status message is shown when tip adjustment done successfully. | |
| onTipError * | string | Status message is shown when tip adjustment getting error. |
Snippet Code
ToPService topService = new ToPService(Activity activity);
topService.tipAdjustment (sessionKey, new ToPService.onTipListener {
@Override
 public void   onTipSuccess(String success){
       // sample success response
  }
@override
public void   onTipError(String errorObject) {
        // sample error response
 }

});
Reports API
The Transaction Detail Report gives a breakdown of transactions entered on a specified reporting period and includes information of the transactions.
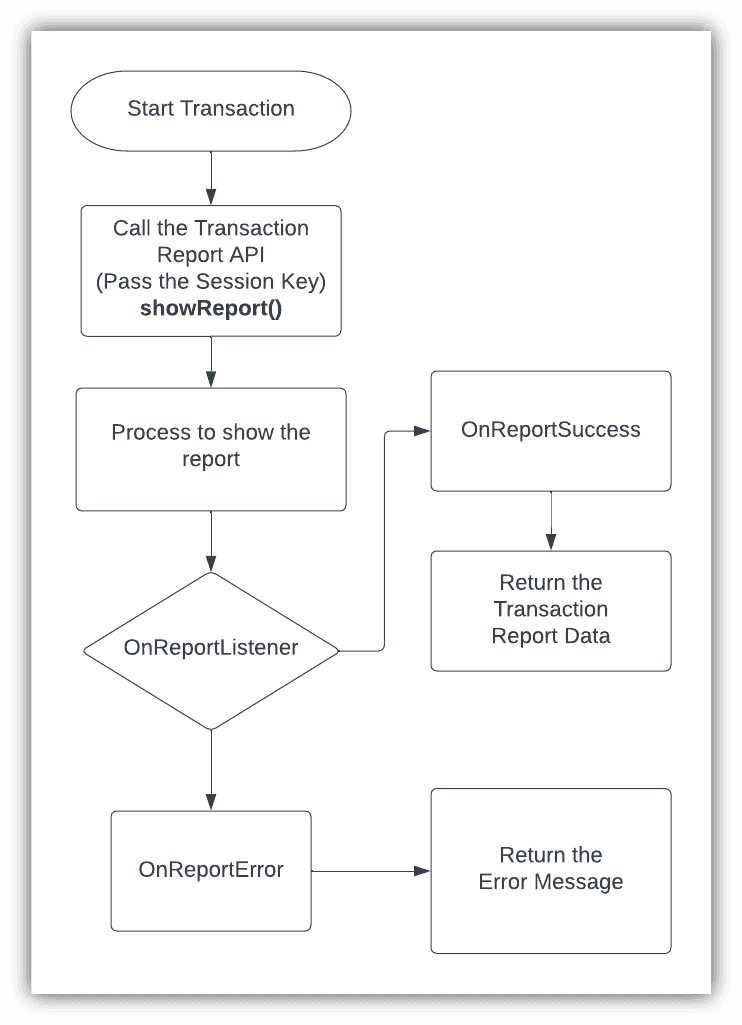
Request Parameters
| Field | Type | Description | Example |
|---|---|---|---|
| sessionKey * | string | Pass the Session key which received on successful registration. | ff8c2759-ba8e-4abe-a4a7-9f6d116194e9 |
| onReportListener * | string | Create an instance object & pass the object or create Anonymous callback to receive response. | new onReportListener (); or new onReportListener ({ }); |
Response Parameters
| Field | Type | Description | Example |
|---|---|---|---|
| onReportSuccess * | string | Status message is shown, once reports get displayed successfully. | |
| onReportError * | string | Status message is shown when reports not displayed. |
Snippet Code
ToPService topService = new ToPService(Activity activity);
topService.showReport (sessionKey, new ToPService.onReportListener {
@Override
 public void    onReportSuccess(String success){
       // sample success response
  }
@override
public void    onReportError(String error) {
        // sample error response
 }
});
Sample Source Code
Go Live Requirements
To proceed with production (Go-Live), the following steps must be completed in coordination with our team:
The integrator must provide the SHA-256 fingerprints for:
- The locally signed application (debug/release, as applicable)
Command to execute in your terminal:
keytool -list -v -keystore your_keystore.jks -alias your_alias
- The app store–signed application (Play Store or relevant store)
Steps in Google Play Console
-- Log in to Google Play Console
-- Select your application
-- Go to Setup → App integrity
-- Scroll to the App signing section
-- Under App signing key certificate, you will see: SHA-256 fingerprint
Based on the provided SHA-256 keys, we will generate and share the following production artifacts:
- Production AAR file
- Production .fin file (from backend configuration)
- Please allow up to one week for the provisioning process to be completed.
The integrator must:
- Replace the testing AAR with the provided production AAR
- Ensure the Toplite production version is correctly mapped
- Generate the signed APK or AAB using the production configuration
After generating the signed APK/AAB, the integrator must perform the finalization process based on the target OS version.
Please refer to the following link for the finalization process, including the required tools and configuration files:
We will provide:
- Step-by-step finalization instructions
- Production .fin file
- Finalizer tool required to complete the process
Completion of the above steps is mandatory before submitting the application to production or app store release.
Help
Email us directly at devsupport@denovosystem.com with any questions or suggestions.
Last updated on October 5, 2026